Getting started with OpenCV
To get things started, I've decided to document the process of getting OpenCV to work on Linux. More specifically, to get it to work on Code::Blocks. To do this I began by downloading the 2.4.13 release of OpenCV from here. My choice of 2.4.13 was because following the procedures mentioned in this post with 3.1.0(the latest release at the time) returned some weird error when running 'make' from the terminal. After downloading the .tar file, I proceeded to unzip it by running the following in the terminal.
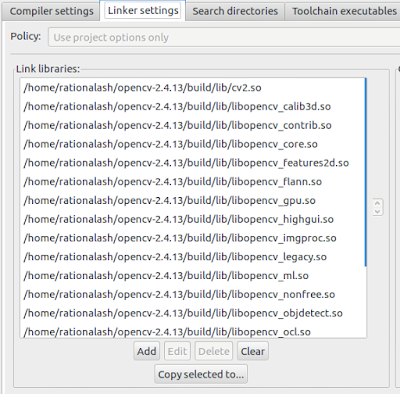
 Having installed OpenCV successfully, I now had to link the appropriate libraries in Code::Blocks so that the compiler could compile it. To do this, you have to go to the compiler settings in the Code::Blocks toolbar and click on the linker tab. Then you have to link all the modules that are necessary for the project. It should look something like shown on the left. Similarly, you have to link modules in the "Linker" and "Compiler" tab under the "Search directories" tab.
Now, we begin testing the setup. To do this, we'll use the following piece of code. Here, we create objects for the class 'Mat' called 'input_img' and 'org_img'. 'org image' reads the sample.jpg and without any changes whereas 'input_img' converts the original image into its grayscale version. Then we use 'namedWindow' to create two windows,"Output" and "Gray_output", which will display the original and well the grayscale image respectively. As you may have guessed, 'imshow' displays the images stored inside the objects in the windows that we've created. Also, for those curious, the 'waitKey' function waits for a keystroke from the user before executing the rest of the code. Which means that once the user inputs a random keystroke, the windows are closed and the program terminates.
unzip opencv-2.4.13.zip
Then, I proceeded to make a build directory and opened the directory in the terminal as follows.cd opencv-2.4.13
mkdir build
cd build
At this point the terminal should look something like shown below.
Now from here, we have to start configuring the cmake files. Generally, the configuration is done by running a command of the following format in the terminal.
cmake [optional parameters] <path to the OpenCV source directory>
In my case, I was planning to use OpenCV using C++. If you want to configure it such that it works for Java and Python, you'll have to make additional adjustments. For these adjustment, you can simply look around on the internet. In particular, this is on excellent tutorial I came across for the python installation.cmake -D CMAKE_BUILD_TYPE=RELEASE -D CMAKE_INSTALL_PREFIX=/usr/local ..
After this, I ran the 'make' command followed by the 'sudo make install' command. Running the two commands in succession should display a progress bar on the terminal. Having completed this, OpenCV has been installed on my computer.make
sudo make install
 Having installed OpenCV successfully, I now had to link the appropriate libraries in Code::Blocks so that the compiler could compile it. To do this, you have to go to the compiler settings in the Code::Blocks toolbar and click on the linker tab. Then you have to link all the modules that are necessary for the project. It should look something like shown on the left. Similarly, you have to link modules in the "Linker" and "Compiler" tab under the "Search directories" tab.
Now, we begin testing the setup. To do this, we'll use the following piece of code. Here, we create objects for the class 'Mat' called 'input_img' and 'org_img'. 'org image' reads the sample.jpg and without any changes whereas 'input_img' converts the original image into its grayscale version. Then we use 'namedWindow' to create two windows,"Output" and "Gray_output", which will display the original and well the grayscale image respectively. As you may have guessed, 'imshow' displays the images stored inside the objects in the windows that we've created. Also, for those curious, the 'waitKey' function waits for a keystroke from the user before executing the rest of the code. Which means that once the user inputs a random keystroke, the windows are closed and the program terminates.
#include<iostream>
#include<opencv/highgui.h>

using namespace std;
using namespace cv;

int main( int argc, char** argv)
{
    Mat input_img = imread("sample.jpg",CV_LOAD_IMAGE_GRAYSCALE);
    Mat org_image = imread("sample.jpg",CV_LOAD_IMAGE_UNCHANGED);
    if(input_img.empty())
    {
        cout<<"There is no readable input here!";
        return -1;
    }

    else
    {
        namedWindow("Output",CV_WINDOW_NORMAL);
        namedWindow("Gray_output",CV_WINDOW_NORMAL);
        imshow("Output",org_image);
        imshow("Gray_output",input_img);
        waitKey(0);
        destroyWindow("Output");
        destroyWindow("Gray_output");
        return 0;
    }
}
Given your installation was correct, the output should consist of two images; one showing your original image while the other shows a black and white version of it.


Comments
Post a Comment